How to Upload to to S3 When Cloudfront Has an Oai Policy
How to admission S3 hosted website via CloudFront using OAI(Origin Access Identity)
We can host our static website on Amazon S3 Saucepan, which nosotros all know. Only in that instance, nosotros have to keep our s3 bucket publicly available or publicly accessible. Sometimes, this configuration is fine for small-scale projects or demo projects. Merely when nosotros call back about the production surround at that time this configuration is a little bit insecure or problematic.
So, we can admission our s3 hosted website via CloudFront using OAI(Origin Access Identity). In this configuration, the S3 bucket will not be publicly available or publicly attainable. S3 Saucepan's objects are only accessible from CloudFront's Origin Access Identity(OAI). Every bit I have noticed, it's a very famous scenario in the AWS Solutions Architect Acquaintance exam.
What is Origin Admission Identity(OAI)
The CloudFront Origin Admission Identities page lists all Origin Admission Identities that were created past the RightScale account. An Origin Access Identity (OAI) is used for sharing individual content via CloudFront. The OAI is a virtual user identity that volition exist used to give your CF distribution permission to fetch a private object from your origin server (e.g. S3 bucket).
Simple Architecture
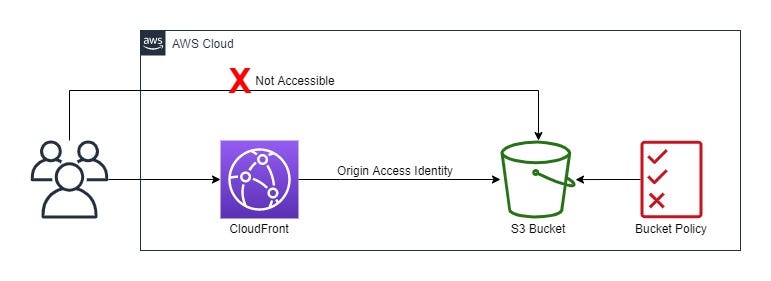
At present, let me explicate the to a higher place architecture. If the user volition fire DNS query directly on the S3 website URL at that time user will get connection timeout, considering our S3 saucepan is non publicly attainable and the S3 bucket policy only allows from CloudFront Canonical User. When the user will fire DNS query on CloudFront URL at that AWS automatically redirect your query to S3 website URL, and S3 bucket policy only allows from CloudFront every bit I mentioned to a higher place.
So, now let'due south implement the in a higher place configuration.
Implementation
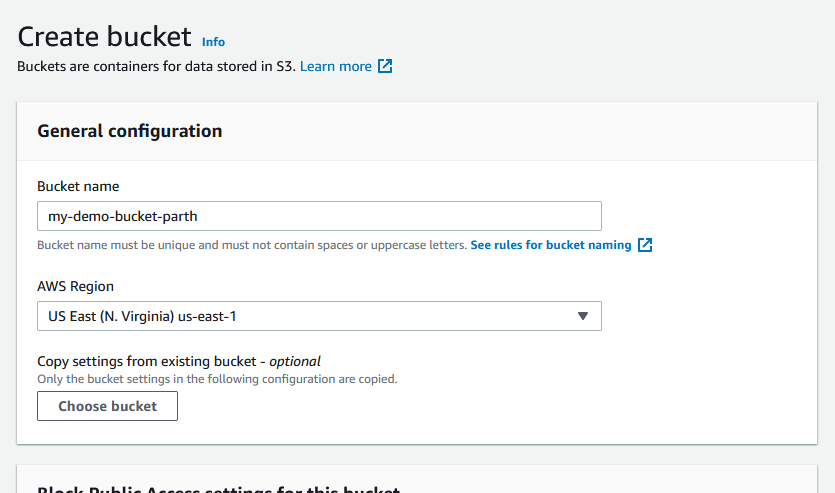
First, log in to AWS Management Console and go to Amazon S3 Panel. In the S3 panel Create New Bucket with default configurations.
Once, the saucepan has been created then become to the Backdrop tab of that bucket.

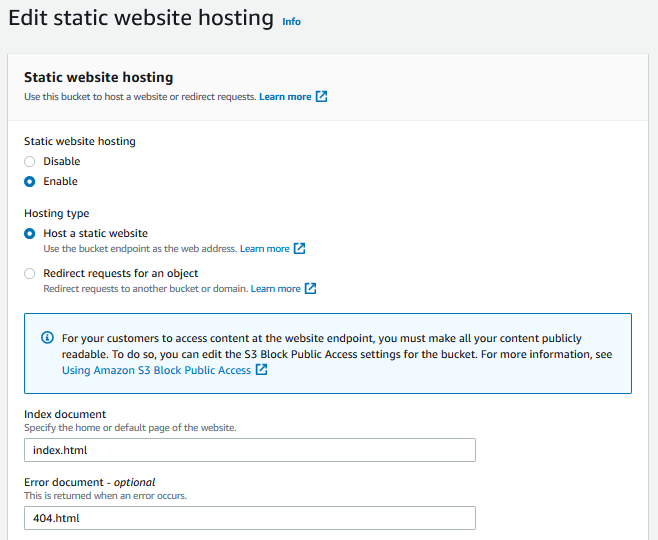
In the Properties tab, scroll down up to the Static Website Hosting section, in that section click on the Edit button and select Enable. When you will select Enable then you will get few configuration options, then in those options Hosting Type would be Host a static website, Index document would exist your main page of the website (eastward.g. index.html), and Error document(optional) would be error page if you are having (e.g. 404.html ). In the redirection rule, don't need to do anything and Save Changes.
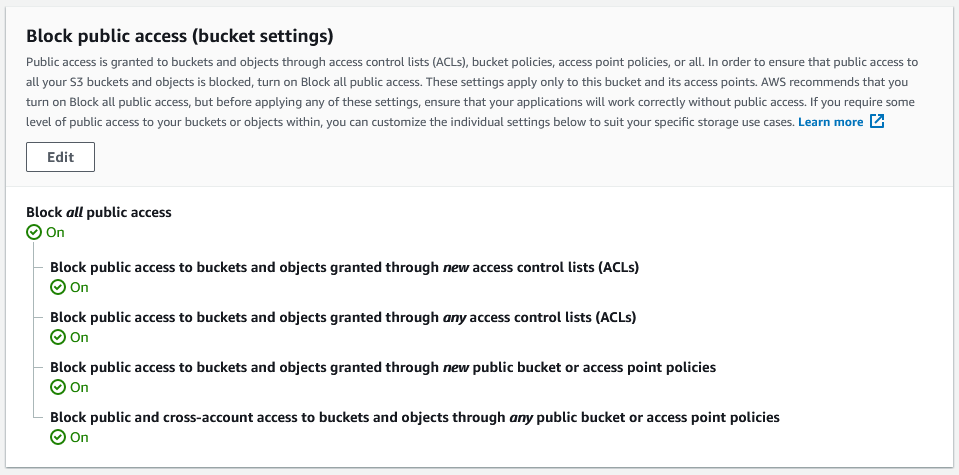
Now, go to the Permission tab of that S3 saucepan. In Permission, the tab must bank check-in Cake public access (bucket settings), which means Block all public access.
Now, get to the CloudFront Console. Over there create Distribution past clicking on Create Distribution button.
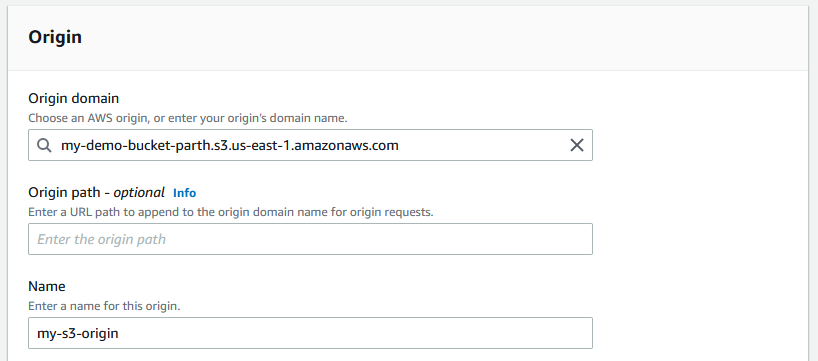
In the CloudFront distribution cosmos process, the offset department is Origin. In the Origin section, Origin Domain selects the S3 bucket which nosotros have only created. Origin Path, leave it blank. Name, write according to your requirements.
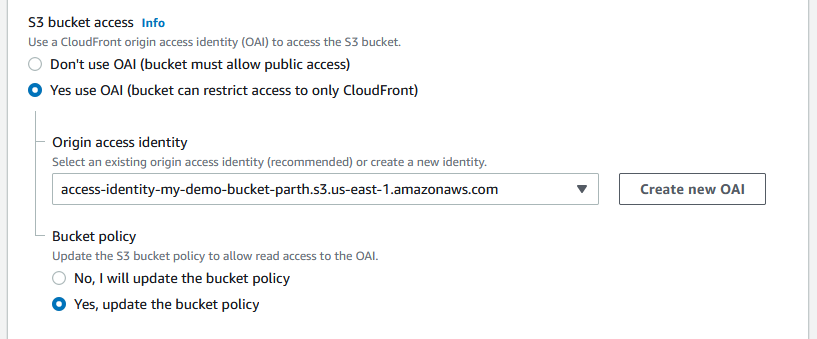
S3 bucket access is the main or core part, in this Yes use OAI (bucket can restrict admission to only CloudFront) and create new OAI. In Bucket Policy, click on Yeah, update the saucepan policy, what it will do, information technology will add together below bucket policy in your S3 Saucepan'due south policy.
          {
            "Version": "2008-x-17",
            "Id": "PolicyForCloudFrontPrivateContent",
            "Statement": [
            {
            "Sid": "1",
            "Outcome": "Allow",
            "Principal": {
            "AWS": "arn:aws:iam::cloudfront:user/CloudFront Origin Access Identity <<OAI ID>>"
            },
            "Action": "s3:GetObject",
            "Resource": "arn:aws:s3:::<<bucket-proper noun>>/*"
            }
            ]
} 
In Origin section, go out other configurations as information technology is or bare.
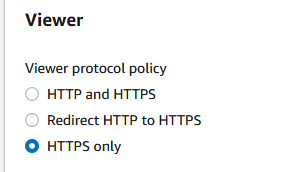
Now, the 2d section is Default cache behavior. In this section, nosotros will go out almost configurations as it is, just we demand to change simply 1 option, that is Viewer protocol policy. Information technology would be HTTPS just.
In the Settings, we need to add value in the Default Root Object field, and the value would be your main file or object proper name(e.chiliad. alphabetize.html).

Now, exit all other configurations default and create a distribution. CloudFront volition accept few minutes to deploy distribution.
Once the distribution has been deployed, then you will become the default CloudFront URL, copy that URL and search in the browser. If you accept configured all settings properly every bit I have mentioned and then you will exist able to see the home page of the website.

Cheers for reading,
For whatsoever query contact us on LinkedIn.
Exercise non forget to follow me on the following platforms, and share with your friends
LinkedIn:
https://www.linkedin.com/in/sandip9334/
https://world wide web.linkedin.com/in/parth-trambadiya/
Medium:
https://medium.com/aws-poc-and-learning/
https://trambadiyaparth.medium.com/
https://sandippatel9334.medium.com/
Youtube:-
https://www.youtube.com/channel/UChWn84ytxW9rrrvZJlsP-ZA
Portfolio:
https://parthtrambadiya.me
bechtoldgustanotests.blogspot.com
Source: https://medium.com/aws-poc-and-learning/how-to-access-s3-hosted-website-via-cloudfront-using-oai-origin-access-identity-720ad7c57f15
Post a Comment for "How to Upload to to S3 When Cloudfront Has an Oai Policy"